2010/05/20

The Importance of Doing Research


Assalam...
Last time I was doing a research on Brunei's history and came across the following image:

I was wondering... "how come?"... If you are given a task to design or draw a specific image, make sure you at least do a little research or else the result might turn out to be just like in the picture above...
Just to share it with biskita untuk sama-sama memikirkannya... Sekian..

2010/05/18

Basic Print Screen Trick


Salam Anak IT.
"Print Screen" key on my keyboard

How many of you treat the "Print Screen" key on your keyboard as a friend? Those who are doing assignments on "System's User Manual" will most probably familiar with this feature. Last time when I checked someone's system documentation from the technical college, I found out that there are people who always use the Print Screen key but are not doing it properly. What they always do is that simply paste the whole thing in a word processor that they are working on (such as MS Word) and then CROP the image... As results, there are "extra" irrelevant bitmap pixels on every edges of the image.
For example, I want to get the screenshot of one specific window. When I press "Print Screen" key alone, it will give me like the following image:

You do not have to worry if it is a little bit "weird" for you since I am using 2 monitor screens extended but yes, the "Print Screen" key did capture the whole screen... I only want to capture the PDF Reader's window with the "BRUNEI DARUSSALAM" wording in it... How am I going to do that?... Is that even possible?...
The "key" of making it possible is the "Alternate" key or also known as "Alt" key.
"Alt" key on my keyboard

Try to combine the "ALT" key with the "Print Screen" key and paste the clipboard item into any image processing applications (Adobe Photoshop, GIMP, MS Paint etc.) and see what will appear. Make sure that the targeted window is "active" in a way that it is "selected"? Hahaha lebih kurang miatu la...
The expected result

Try to experiment other combination of key as well such as CTRL key or even SHIFT key and examine the result for your own knowledge and skill.
That is it for today. If you have any doubts or questions to ask, let me know through this online form.
~ Terima kasih daun keladi, ada idea jumpa lagi ~
Sekian. Wassalam.

2010/05/16

Network+ Certification


"The CompTIA Network+ certification is the sign of a competent networking professional. It is an international, vendor-neutral certification that proves a technician’s competency in managing, maintaining, troubleshooting, installing and configuring basic network infrastructure.

Since its introduction in 1999, more than 235,000 people have become CompTIA Network+ certified. Microsoft includes CompTIA Network+ in their Microsoft Certified Systems Administrator (MCSA) program, and other corporations such as Novell, Cisco and HP also recognize CompTIA Network+ as part of their certification tracks.

Although not a prerequisite, it is recommended that CompTIA Network+ candidates have at least nine months of experience in network support or administration or academic training, along with a CompTIA A+ certification.
" - CompTIA
CompTIA Network Certification Path
Network+ (N10-004 v2009) Certificate
For further information on the Network+, go to CompTIA's website at http://www.comptia.org/certifications/listed/network.aspx or simply click here. Those who need some guidance on the certification, you may approach me.
As Anak IT's motto, "Mun rotan ganya sejangkal, jangan mendaluh lautan dalam" encouraging you to improve and further your skills.
Sekian, semoga biskita mendapat inspirasi dan juga manfaat. Wassalam.

2010/05/15

Using External StyleSheet

I'm assuming if you are reading this tutorial, you already know what Cascading Stylesheet (CSS) is. If you don't, you should head here first.

External stylesheet gives an advantage over inline stylesheet (that is having the stylesheet inside the HTML: it reduces the page load time since the CSS is all inside one file. Moreover, the changes made on that one file are simultaneously reflected on all pages that link to the stylesheet.

So, how do we go about using external stylesheet?

Step 1:

First of all, you will need to have all your CSS codes saved into a file. You can name the file anything you want but be sure to save it as .css extension. Meaning, if you name your stylesheet 'style', the full filename is 'style.css'.

Step 2: 

Upload this file to your server. Take note of the directory where you upload the stylesheet. Usually it is stored in the root directory.

Step 3:

Next, open up your HTML file and stick this line between your tags:


However, if you are storing the stylesheet in a specific folder (not in root directory), for example in a folder called styling, the code will look like this:


Now you may want to know what purpose does the code above serves. The code above is used to call or load up the stylesheet into your HTML.

Step 4:

Save your HTML file (and upload it to your server if you haven't) and you're done!

2010/05/14

My Personal Alarm Clock


Salam Anak IT.
Today I would like to share my software-based personal alarm clock that I created using simple Visual Basic 6 coding. It was built for my personal purpose but now I just feel like I want to share it with Anak IT Readers... You may download the zip file (consists of the program and MP3 file) here. Here we go...
Facts and Features:
  • Created in 2007 using Visual Basic 6
  • The program size is only about 100kb
  • It uses Alarm.mp3 file for the "alarm" sound
  • Works well with large speaker
  • Of course it needs a speaker... Hahahaha
  • Bebunyi pada tiap-tiap pukul 7 pagi
  • Using 2 ways of "Custom Alarm Time"; Specific Hour-Minute-Second and Hour Selection (From 1am till 12pm)
Cara penggunaan (Specific Hour-Minute-Second):
  1. Taip waktu yang biskita inginkan di dalam format "Jam:Menit:Saat"
  2. Tekan butang "Add" or simply press Enter key on your keyboard
  3. By using this method, the ring will only last about 60seconds+
You will realise that the "Nill" has changed to your requested time, in the following example, it is written as "21:35:00"
Just wait for the time and it will ring the Alarm.mp3 at the time specified. You may use any other MP3 file such as your favourite song or HEAVY METAL SONG supaya tebangun slajur when it rings hahahaha but remember to place your MP3 file in the same folder where the program resides and rename the MP3 file into "Alarm.mp3" with capital A.
Cara penggunaan (Hour Selection):
  1. Simply select the hour and let it be~
  2. Baca doa sebelum tidur
  3. This method WILL NOT STOP THE RING unless you close the program or buang speaker biskita ke sungai (which is good for those yang "tidur mati" hahaha)
Simple? Huhuhu maybe the program is not as "user-friendly" as you expected it to be but it was created for my own personal usage in the first place...
Some useful tips:
  • Jauhkan speaker dari tempat tidur
  • Pasang volume speaker basar-basar biar hingar
  • Taruh gam plastik arah volume speaker so it will FORCE you to "betukang-tukang" membuka balik the tape (where by that time you will be more than awake hahaha)
  • Mun kan mau lebih bisai, replace the default MP3 file with MP3 urang membaca azan or simply record your own voice saying "HOIII WANGGG BANGUUUNNN!!!" or something like "Aku banaaa banaaaaa kannnn kauuuuuuu~" or anything you like...

Sekian, harap ianya akan dapat mendatangkan fa'edah kepada kita semua. Wassalam.

2010/05/12

Test Your Understanding On Computer Network


Without any aids from books and google, I got 62% and I did not pass. Hahahaha... How about you? Find it out yourself here.

2010/05/09

Windows Keyboard Shortcuts


Basic Keyboard Shorcuts for Windows

ShorcutFunction
CTRL+CCopy
CTRL+XCut
CTRL+VPaste
CTRL+ZUndo
DELETEDelete
SHIFT+DELETEDelete the selected item permanently without placing the item in the Recycle Bin
CTRL while dragging an itemCopy the selected item
CTRL+SHIFT while dragging an itemCreate a shortcut to the selected item
F2 keyRename the selected item
CTRL+RIGHT ARROWMove the insertion point to the beginning of the next word
CTRL+LEFT ARROWMove the insertion point to the beginning of the previous word
CTRL+DOWN ARROWMove the insertion point to the beginning of the next paragraph
CTRL+UP ARROWMove the insertion point to the beginning of the previous paragraph
CTRL+SHIFT with any of the arrow keysHighlight a block of text
SHIFT with any of the arrow keysSelect more than one item in a window or on the desktop, or select text in a document
CTRL+ASelect all
F3 keySearch for a file or a folder
ALT+ENTERView the properties for the selected item
ALT+F4Close the active item, or quit the active program
ALT+ENTERDisplay the properties of the selected object
ALT+SPACEBAROpen the shortcut menu for the active window
CTRL+F4Close the active document in programs that enable you to have multiple documents open simultaneously
ALT+TABSwitch between the open items
ALT+ESCCycle through items in the order that they had been opened
F6 keyCycle through the screen elements in a window or on the desktop
F4 keyDisplay the Address bar list in My Computer or Windows Explorer
SHIFT+F10Display the shortcut menu for the selected item
ALT+SPACEBARDisplay the System menu for the active window
CTRL+ESCDisplay the Start menu
ALT+Underlined letter in a menu nameDisplay the corresponding menu
Underlined letter in a command name on an open menuPerform the corresponding command
F10 keyActivate the menu bar in the active program
RIGHT ARROWOpen the next menu to the right, or open a submenu
LEFT ARROWOpen the next menu to the left, or close a submenu
F5 keyUpdate the active window
BACKSPACEView the folder one level up in My Computer or Windows Explorer
ESCCancel the current task
SHIFT when you insert a CD-ROM into the CD-ROM drivePrevent the CD-ROM from automatically playing
Other resources:

2010/05/07

Alert - MSN Spammer (Continued)


Salam readers...
This might be the continuation from my previous article called "Alert - MSN Spammer (Email Version)" and so I will write less for today...
Still remember the "heyyyyy"? Here I will show you another "heyyyyy" examples, not from email but from MSN Messenger... "Enjoy"... Huhu...
First "heyyyyy"

Second "heyyyyy"

Third "heyyyyy"

Again?... From different email?

There are actually more than these... These are those I had a chance to "print screen"...
Same admonition... "BE CAREFUL"...

2010/05/05

Reuse - Laptop Cooling Fan


Salam Anak IT.
Last time I posted an article on "Another way to make use your USB Extension Cable". The objective is to re-use any computer parts or computer related thing yang langsung inda lagi bepakai into something more useful. Today I have another "junk" for that.
It is my laptop's Cooling Fan jenis "portable". Since I seldom use my laptop, my cooling fan ampai-ampai tah ganya... So daripadanya ampai-ampai, tantu digunakan in other different way...
We all know that mostly (or maybe semua) cooling fan yang bejual di kadai atue makai USB cable as its power source's channel/medium... So... I was thinking... Is it possible if tane pakai USB device (usually around 5 volts) ke karan dinding (200+ volts)? Inda melatup ka tue if modify the wire then connect ke socket karan dinding? Hahaha obviously SOMETHING bad would happen... So I didn't try that out like I usually did... Then... I was thinking again... Of another alternative...
Tadaaa~ I saw this plug "ampai-ampai" sebalah my printer... So I smiled hahahaha you know what I was thinking... This converter plug is not an ordinary plug... It converts the current's voltage (and other elements which I am not familiar with since I am not an Electrical personnel) into USB's international standard voltage so that any USB devices can have power supply from any ordinary wall plug's current (lurus ka tue? haha).
The result? I used it as a cooling fan for both internet modem and router in the house. Well maybe not as good as "kipas angin" but just enough to ventilate the devices.
Time malam inda belampung. Bisai dijadikan lampung untuk tidur.

Cooling Fan - Sponsored by: http://anak.it/

Sekian. Wabillahittaufiq walhidayah.

P/S : Good luck for those who are having exams especially those yang from UBD, ITB & UNISSA... Exam fever~ =)

2010/05/02

Replacing new Thermal Grease


Assalam Anak IT Readers,
Do you have a computer? laptop? If ada, brapa lama dah biskita memakai? Setahun? Dua tahun? Have you ever wonder after a certain period of time, computer biskita mikin skajap hangat rasanya? If yes then you need to read the rest of this article..
Pernah biskita melaha Processor biskita? If yes, apa yang biskita nampak in between the processor sama heat sink processor? Something yang usulnya macam chewing gum? Hahaha well that is what we call Thermal Grease.
What does this thermal grease do is basically untuk menulung "menyiruk" panas dari processor naik ke heat sink yang biasanya disimpan di atas processor. If biskita masih "blur" pasal thermal grease, cuba biskita fahami this site.
So... Masalahnya pasal thermal grease ane, ia dapat jadi karing and MALFUNCTION sudahnya lama-lama hahaha as in ia inda lagi tekarih untuk "menyiruk" panas dari processor naik ke heat sink... Then ia menjadi "blocker" ta plang which is panas atue inda naik ke heat sink and BEPARAM arah processor. This actually same goes to video chip, not only processor. I've heard a lot of stories (especially laptop HP) where the motherboard inda lagi dapat dipakai after 1-2 years. This is because of the video chip "kana salai" oleh heat yang ia sendiri produce...
Then... How to avoid this? For my case, I personally need to check on my processor's condition every 4-5 months. Last time I did a check-up and found that my thermal grease is "inda lagi bermaya" nya urang kitani hahaha so I think it is good to share this with you... I will elaborate further on the pictures below:
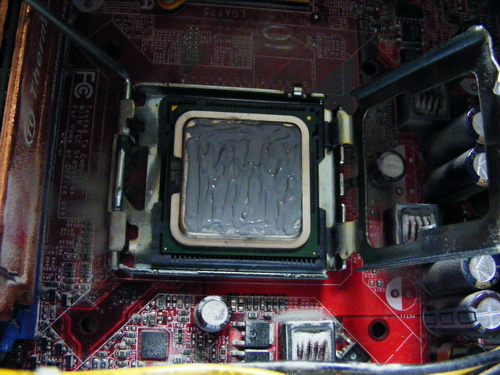
This is my heat sink... As you can see, the thermal grease (grey compound) karing udah... So I need to replace it with new thermal grease...

That is my Dual Core Processor... Can you see the thermal past atasnya?

First, remove the current thermal paste from both heat sink and processor (in my case I used minus type screw driver so kira dikikis-kikis sampai licin)

Tadaaa~ hehehe bacilat selajur... And I forgot to take a picture of my processor yang abis bekikis dah...

Then, prepare your Thermal Grease... I used ThermalTake's TG-2 Thermal Grease

This thermal grease can be found arah any kadai computer but biasanya yang bisdia jual atue bukannya jenis "standard" thermal grease... Yang biasa ja... So if you want to buy Thermal Grease, I recommend you to buy any brand from ThermalTake, Cooler Master or even better Arctic Silver (Arctic Silver usually comes with remover as well). Try to look for it arah kadai computer Chong Hok (if na salah la) Kiulap berdepanan dengan C.A Mohammad and sebaris Minuman EasyWay...

Apply the thermal grease on top of your processor (or video chip)

Make sure biskita ratakan the thermal grease. The important point is jangan biskita bagi luan tabal. Nipis is better but jangan jua luan nipis. After you are done, pasang balik the heat sink CAREFULLY and switch on computer biskita seperti biasa.

Oh... Another thing... Jangan lupa buang habuk (dust) rah kawasan berhampiran processor (if rajin clean the entire motherboard). Use a brusher.

There you go... If dapat, try to monitor your cpu's temperature from time to time... You may read this "How to monitor CPU temperature" article...
Sekian, wabillahittaufiq walhidayah, harap maklum.

P/S : This activity requires your concentration and precautions since you are dealing with the "brain" of your computer a.k.a processor. You don't want to spoil the processor and bali baru... Unless harganya 30sen hahahaha ;)